Make your own roti (roti plate / pancake)



Roti – it had to happen sometime! Ever since we started our website antilliaans-eten.nl (about 8 years ago now), people have been asking us when we'll publish a recipe for roti. Until a while ago I always dismissed it with 'I document Antillean recipes and roti is not one of them'. Yet that is not quite right and I will tell you why…
Roti – via India to Suriname and the Caribbean
Although we in the Netherlands primarily know roti as a Surinamese dish, that is actually incorrect. Roti actually has its roots in India. There, incidentally, the word simply means ' bread '. So, roti always refers back to the bread... the flatbread... the pancake, whatever you want to call it. But—and this is quite a detail—it is never the food (usually chicken, potatoes, and long beans ) that goes on top.
That is why it is so frustrating to see that many supermarkets and restaurants sell roti (kits) that are primarily geared towards preparing chicken and vegetables. Often, they even say "enjoy a wrap or rice with it" on the back. And that is simply unacceptable.
Roti was 'taken' via India to Suriname and the Caribbean, among others. And although you will not find roti on Aruba, Bonaire and Curaçao, it is eaten on other islands (Jamaica, Trinidad, St. Vincent). So also a little bit Antillean!
You can buy a good roti plate at Surinamese toko's or Chinese supermarkets. You can usually find them in the freezer. Buying online is also possible these days – there are several tokos and online shops that sell roti plates. Would you rather make the roti plate yourself? Then keep reading…
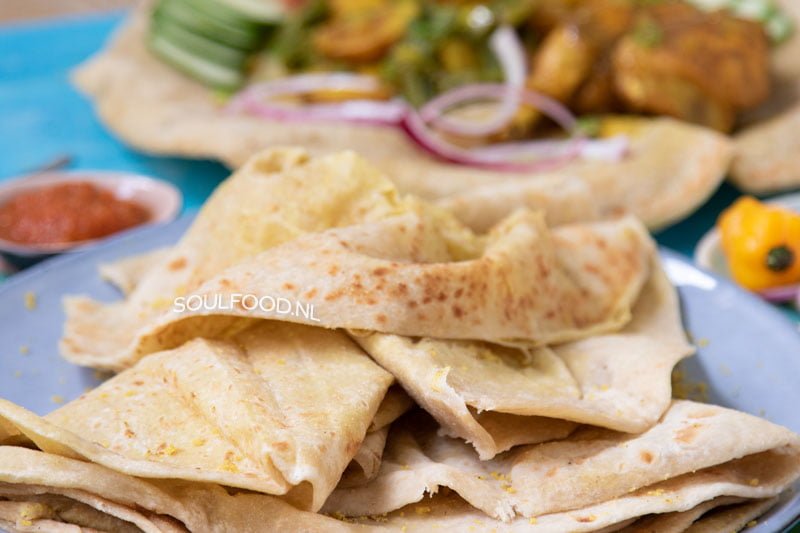
Different types of roti
There are different types of roti. We know the stuffed roti (with a filling of yellow peas or potatoes) best, but this ' buss up shut roti' — originally named Paratha roti— is also irresistibly delicious. That version is not filled, but coated with layers of butter. The result is a velvety soft roti with a hundred layers.
In this recipe we go for the stuffed roti, with a filling of yellow peas. You can make 10 pieces with this recipe.
Ingredients:
For the dough
- 1 kg self-raising flour
- about 600 ml lukewarm water
- 3 tbsp sunflower oil
- 1 tsp salt
For the filling
- 500 gr yellow split peas
- 1 stock cube (chicken)
- 3 tbsp sunflower oil
- 1 clove garlic
- 1 tsp masala
- 1 tsp turmeric
To bake
- 50 gr butter
- 50 ml sunflower oil
Preparation
Mix the self-raising flour with the salt. Make a well in the center and pour in the oil and 3/4 of the water. Knead the whole into a smooth dough. Is the dough too dry? Then add the rest of the water. And does the dough stick? Then add a little extra flour or baking powder.
You may knead the dough until it feels like soft bread dough. This takes about 10 minutes by hand and about 5 minutes with a kneading machine. Then place the dough in a bowl and cover it with a damp tea towel. Let it rest for at least an hour. In the meantime, you can continue making the filling.
For this you wash the split peas and then put them in a pan with water and the stock cube and the turmeric. Use as much water as necessary to just cover the peas. Boil the peas for about 35-40 minutes. Then drain the peas and let them drain in a colander for at least 20 minutes. It is important that the peas cool down well and become dry.
Then grind the peas into powder in a food processor.
Crush the garlic clove and fry it over medium heat in 3 tbsp sunflower oil. Add the masala and finally the peas. Fry the whole on low heat for a few minutes, until it is golden in color. Then let the mixture cool down completely.
More recipes like this?
Almost a million people are now cooking with my recipes. In my books, you will find hundreds more new dishes to discover. The best part? Order today = cook tomorrow!
Roti plates / pancake baking
Now dust your work surface with flour and divide the dough into 10 pieces. Form each piece into a ball. Now hold one ball in your hand at a time and flatten it in the middle. Fill the dough with some of the yellow pea filling and fold it closed again so that the filling is in the center. This is essentially the same as filling a bapao bun (video).
When you have filled all the balls, you can roll them out. Dust your work surface again with flour and roll out the balls into a circle about the size of the bottom of your frying pan. (i.e. the pan in which you will fry the roti). Make sure that the dough does not tear and that the filling remains on the inside.
Now melt the butter and mix it with the sunflower oil. Then heat the frying pan over medium to high heat. Brush the pan with some of the butter/oil and place the roti plate in the pan. Let it cook for a minute, until air bubbles form. Brush the roti again with some butter and turn it over. You can repeat this process (i.e. brush with butter and turn) one or two more times, until the roti puffs up nicely and is golden.
In total, fry each roti for about 3 minutes. Continue until all the roti is fried. Then serve them with a tasty (stew) dish or the traditional masala chicken & long beans . – Enjoy your meal!
More Surinamese recipes


 based on 990 Review (s)